Objective
This is a pictorial tutorial on how to create first Silverlight mobile application for Windows 7. This is very simple article giving you introduction how to setup the environment and run and debug the application.
Since everyone is talking about Windows 7 Mobile development. Let us learn together J
Step 1
Download windows phone developer tools from Here.
Pre requisite are
- Visual Studio 2010
- Windows 7 or Vista
- 2GB Ram
- 3GB space available
To develop window 7 mobile phone application, you need
- Visual Studio 2010 Express for Windows Phone CTP
- Windows Phone Emulator CTP
- Silverlight for Windows Phone CTP
- XNA 4.0 Game Studio CTP
Once you download and install Windows Phone developer tool, all the requirements to develop application will get installed.
Step 2
From Start menu select Microsoft Visual Studio 2010 express edition

Step 3
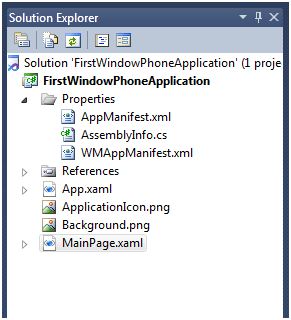
From File select New Project. From Silverlight for Windows phone tab select Windows Phone application project type.

Once selecting that a new project will get created with below solution structure
Step 4
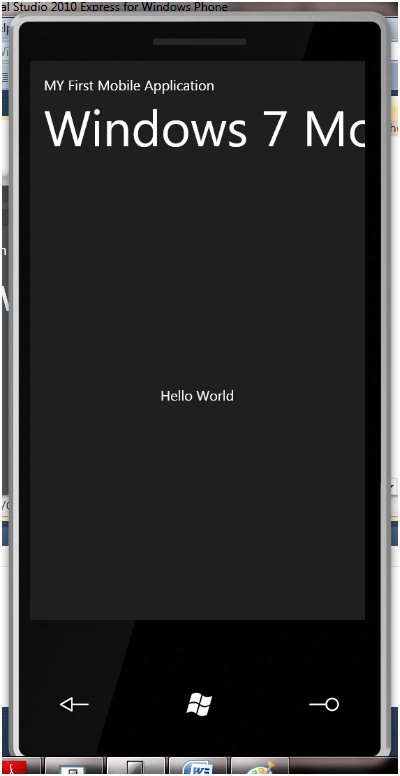
Open MainPage.Xaml and just add a text block. Set the text of the text block as Hello World. Here if you want you can change Title text also.
If you closely look into XAML, you will find there are two Grids inside main Grid. One is title Grid and other is body Grid. So put your text block in the Body grid.
| <phoneNavigation:PhoneApplicationPage
</phoneNavigation:PhoneApplicationPage> |
The code I changed is in bigger font.
Step 5
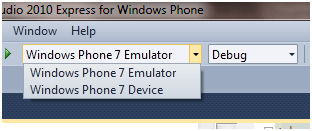
Just press F5 and in Windows 7 mobile emulator you can see the output. In center you can see Hello world. Make sure in Debug option Windows Phone7 Emulator is selected. If it is selected to Windows Phone 7 Device then Visual studio will deploy the application to mobile device directly.
Conclusion
This article explained how to create your first Windows 7 mobile application.
Discover more from Dhananjay Kumar
Subscribe to get the latest posts sent to your email.

One thought on “Creating first Windows 7 mobile application in Silverlight”