
Angular 16 is packed with many exciting features. You can read some of them here:
What is the purpose of the Second Parameter in creating an Angular Signal?
Required @Input properties in Angular
In this blog post, we will learn about- Passing Route Data as Component Input, one of the features of Angular 16.
First, we start with the way we currently do. Let us say you have a route as shown below,
export const routes: Routes = [
    {
        path: '',
        pathMatch: 'full',
        redirectTo: 'home'
    },
    {
        path: 'home',
        component: HomeComponent
    },
    {
        path:'todo/:id',
        component:TodoComponent
    }
];
On the ToDoComponent, you can read the route parameter using the ActivatedRoute service,
private route = inject(ActivatedRoute);

  ngOnInit(): void {
    this.route.params.subscribe(data =>{
      console.log(data['id']);
    })
  }
On the ToDoComponent, you can read the query parameter using the ActivatedRoute service,
private route = inject(ActivatedRoute);

  ngOnInit(): void {

    this.route.queryParams.subscribe(data=>{
      console.log(data['name']);
    })
  }
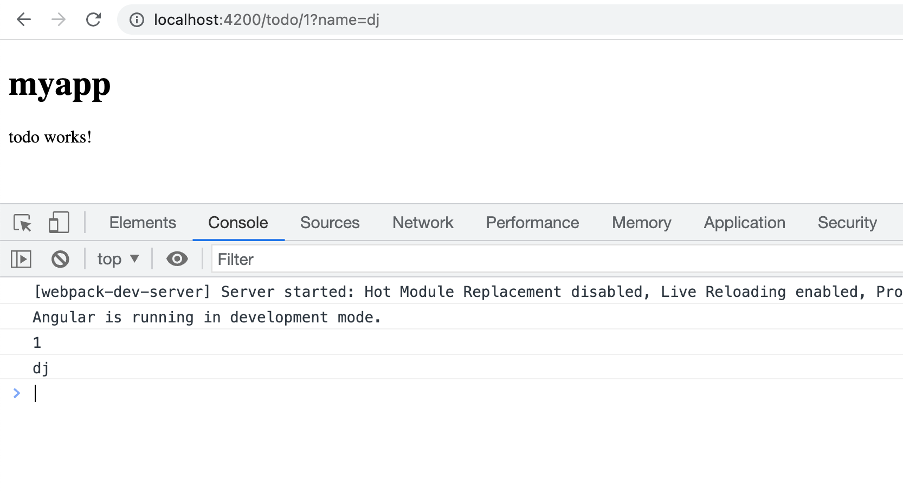
On navigating to http://localhost:4200/todo/1?name=dj you can see the route parameter and query parameter printed on the console as below,
Starting Angular 16, you can directly read the route and query parameters in input decorated properties. There are two steps for that,
- Create input decorated properties with the same name as the route and query parameter.
- In the provideRouter function, pass withComponentInputBinding().
Change the component change as below,
  @Input() id?: string;
  @Input() name?: string;
  ngOnInit(): void {
    console.log(this.id);
    console.log(this.name);
  }
As you notice, the property’s names are precisely the same as route and query parameter names. Next, in the app.config.ts file, add the withComponentInputBinding() feature to the provideRouter() function.
export const appConfig: ApplicationConfig = {
  providers: [provideRouter(routes,withComponentInputBinding()) ],
};
Now On navigating to http://localhost:4200/todo/1?name=dj you can see the route parameter and query parameter printed through the input decorated properties on the console.
You can also give the input decorated properties a different name than the route parameter. To do that, in the input decorator, pass the name of the route or query parameter; on the component, you can have a different name.
@Input('id') todoId?: string;
  ngOnInit(): void {
    console.log(this.todoId);
  }
Besides route and query parameters, you can also map the route data resolver to a @Input decorated property. I hope you find this helpful post and will leverage your Angular application’s excellent Passing Route Data as a Component feature.
Discover more from Dhananjay Kumar
Subscribe to get the latest posts sent to your email.
