Objective
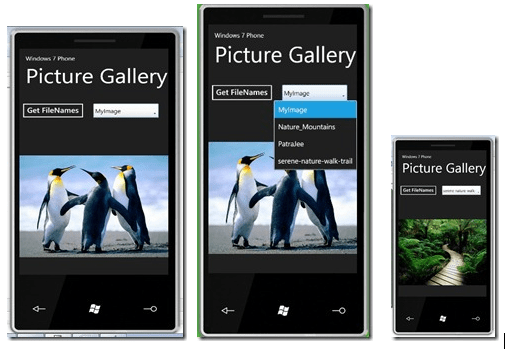
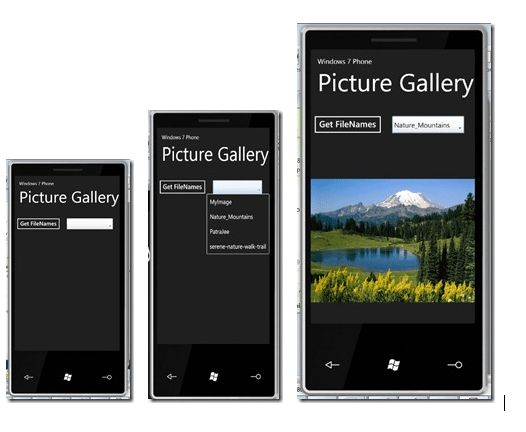
In this article I will give you walkthrough of creating a Picture Gallery for Windows 7 phone. I will show how to fetch images from server using WCF REST service. The final output would be like below
Please read this article before going through this article.
In this article, majorly I am going to show you two things
- How could we process image from file system of server using REST service and return the jpeg format as response.
- How could we consume REST service in Windows 7 phone application? And how could we de- serialize stream at in windows 7 phone application.
Working Diagram
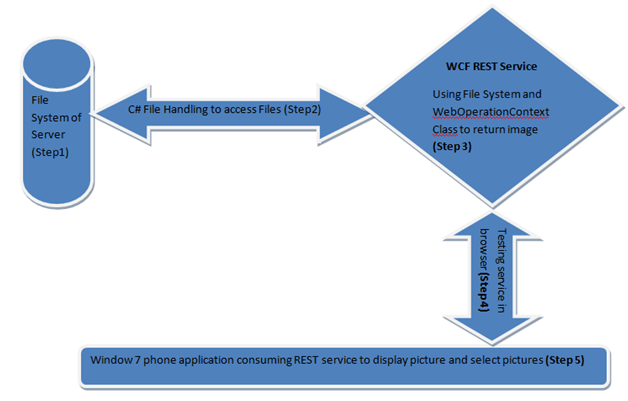
If you see above diagram, we are going to perform below steps.
- Image files are at some certain location of server.
- Using .Net file handling classes, we will fetch those image files.
- Using WCF REST service we will return image in form of stream.
- We will test the REST service in browser.
- We will consume the REST service in Windows 7 phone application.
Step 1
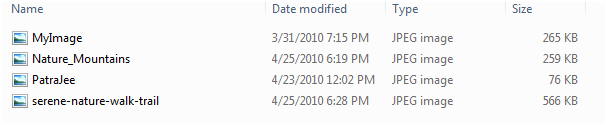
On your server or hard disk of your development machine put some images in a particular folder of a particular drive. I am putting some images inside IMAGES folder of D drive.
I do have below images inside D:\Images folder
Step 2
Accessing the File System in service
To access the files and work with file system in .Net we need to add namespace System.IO .
Now if we want to access name of all the files inside a particular folder, we need to access all the files using instance of DirectoryInfo class. So the code to return all the file names is as below,
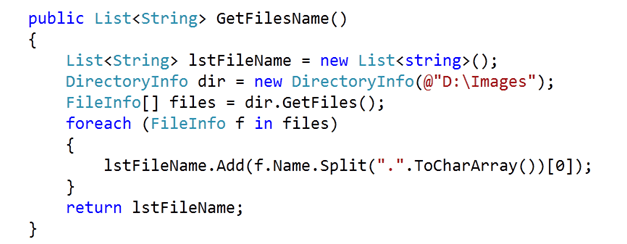
In above code
- I am creating instance of List of string.
- I am creating instance of DirectoryInfo class. In constructor, I am passing the location of the directory.
- Using GetFiles method of DirectoryInfo class, I am fetching all the files in that particular directory.
- I am iterating through FileInfo array and fetching name of all the files.
- I am splitting the file name over dot(.) because I do not want extension of the file to be added as file name.
- Finally I am adding the file names in list of string and returning it.
Step 3
In this step, I will create a WCF REST Service. This Service will return Files name and images as stream. So to create WCF REST Service follows below steps
Step 3A
Create a WCF application. To create a new application File -> New -> Web-> WCF Service Application.

Step 3B
Remove all the default code created by WCF. Remove code from IService 1 interface and Service1 class. Remove the code from Web.Config also. Open Web.Config and remove System.Servicemodel codes.
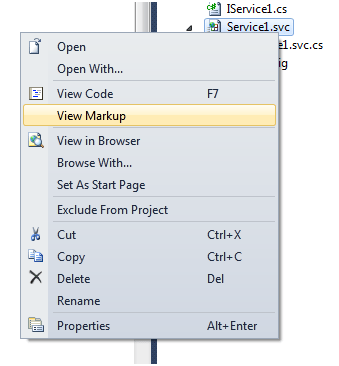
Step 3C
Right click on Service1.svc select View markup and add below code
<%@
ServiceHost
Language=”C#”
Debug=”true”
Service=”FetchingImageinBrowser.Service1″
CodeBehind=”Service1.svc.cs”
Factory=”System.ServiceModel.Activation.WebServiceHostFactory”
%>
Step 3D
Now I will create Contracts. There would be two service methods. One would be returning FilesName and other would be returning Stream.
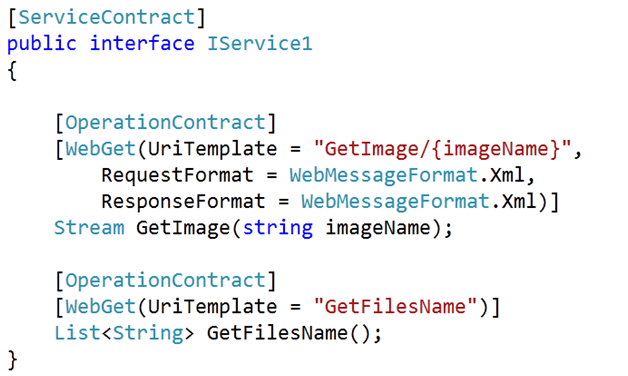
If you see the above Service Contract, you will find
-
GetImage operation contract is taking file name as input parameter and returning stream. This service method will be accessed through default URI of hosting server slashed with GetImageand then slashed with input parameter.
-
GetFIlesName operation contract is returning all the files name of a particular directory. This service method will be accessed through below URL.
http://localhost:53767/Service1.svc/GetFilesName
In both above case service is hosted on local server on the port 53767.
Step 3E
In this method we will define the service. Already in step 2 I have shown you, how we could fetch name of all the files from a particular directory. The other service method returning stream is below.
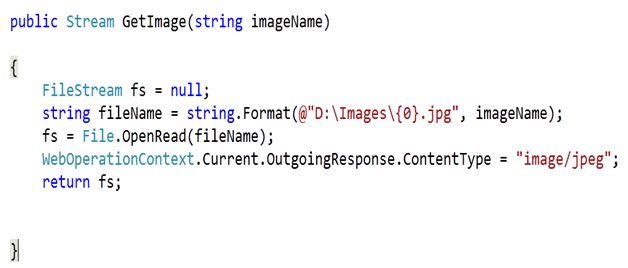
If you read the above code, I am opening the input file in FileStream. Then using WebOperationContext class, I am setting the Outgoing response as Image and Jpeg.
For your reference, the full source code for the service is as below
Contract (IService1.cs)
1 using System;
2 using System.Collections.Generic;
3 using System.Linq;
4 using System.Runtime.Serialization;
5 using System.ServiceModel;
6 using System.ServiceModel.Web;
7 using System.Text;
8 using System.IO ;
9 namespace FetchingImageinBrowser
10 {
11 [ServiceContract]
12 public interface IService1
13 {
14
15 [OperationContract]
16 [WebGet(UriTemplate = “GetImage/{imageName}”,
17 RequestFormat = WebMessageFormat.Xml,
18 ResponseFormat = WebMessageFormat.Xml)]
19 Stream GetImage(string imageName);
20
21 [OperationContract]
22 [WebGet(UriTemplate = “GetFilesName”)]
23 List<String> GetFilesName();
24 }
25 }
26
Service Definition (Service1.svc.cs)
1 using System;
2 using System.Collections.Generic;
3 using System.Linq;
4 using System.Runtime.Serialization;
5 using System.ServiceModel;
6 using System.ServiceModel.Web;
7 using System.Text;
8 using System.IO ;
9 namespace FetchingImageinBrowser
10 {
11 public class Service1 : IService1
12 {
13
14 public Stream GetImage(string imageName)
15
16 {
17 FileStream fs = null;
18 string fileName = string.Format(@”D:\Images\{0}.jpg”, imageName);
19 fs = File.OpenRead(fileName);
20 WebOperationContext.Current.OutgoingResponse.ContentType = “image/jpeg”;
21 return fs;
22
23 }
24
25 public List<String> GetFilesName()
26 {
27 List<String> lstFileName = new List<string>();
28 DirectoryInfo dir = new DirectoryInfo(@”D:\Images”);
29 FileInfo[] files = dir.GetFiles();
30 foreach (FileInfo f in files)
31 {
32 lstFileName.Add(f.Name.Split(“.”.ToCharArray())[0]);
33 }
34 return lstFileName;
35 }
36 }
37 }
38
Step 4
Run the service. By default service will be hosted in Cassini server. We can test this service in browser because it is REST service.
When you run URL http://localhost:53767/Service1.svc/GetFilesName , You will get below output. All the files inside the folder is listed in the browser.

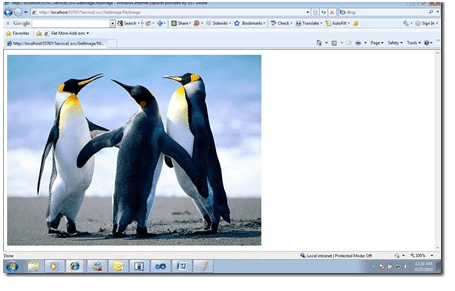
When you run URL http://localhost:53767/Service1.svc/GetImage/MyImage, you will get MYImage (name of the image file) in browser like below
So far, we have created the service and tested successfully in the browser. So we are all set to consume the service in Windows 7 Phone application.
Step 5
Since service is up and running, now we can consume the service anywhere. In this tutorial we are going to consume the service in Windows 7 Phone application.

Step 5A
Create a new Windows Phone Application. From Silverlight for Windows Phone tab select Windows Phone Application project type.

Step 5B
In this step, we will design the page.
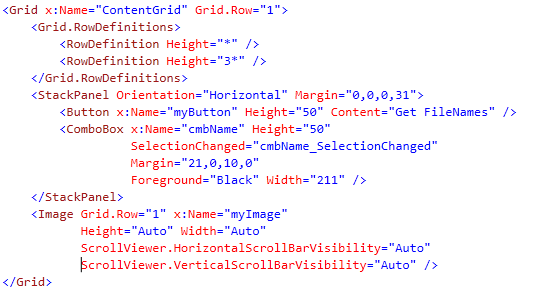
- I have divided the Content Grid in two rows with the ratio of 3:1
- In first row put a stack panel.
- Inside stack panel put a Button and a Combo box.
- Register selection changed event with Combo box.
- In second row put a Image control.
- Set the height and width of the image as Auto.
Step 5C
In this step we will write the code behind to consume the service.
On click event of button, we will call the service and get the entire files name inside the particular directory.

- In above code, I am using WebClient to do asynchronous call to REST service.
- If you see closely in string I am assigning the same URL we tested in step 4 to fetch file names.
- Using DataContractSerializer class we are creating an instance and passing type we are going to de serialize in constructor.
- We are reading all the objects in instance of DataContractSerializer and explicitly typecasting it to List<String>.
- One by one we are iterating to list and adding each filename (string) as item of combo box.
On changed event of combo box, we will pass the image name as selected item in combo box and fetch the image and set that image as source of image control.
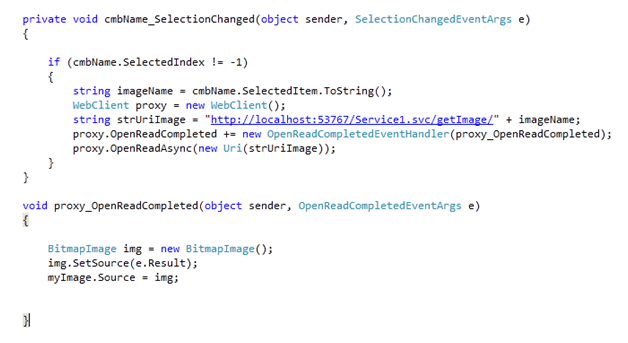
- In above code, I am using WebClient to do asynchronous call to REST service.
- If you see closely in string I am assigning the same URL we tested in step 4 to fetch particular image.
- I am creating instance of BitmapImage.
- Setting the source of the image as response from the service.
- Setting the source of image control as instance of BitmapImage.
For your reference whole source code is as below,
MainPage.Xaml
1: <;phoneNavigation:PhoneApplicationPage
2: x:Class="RESTServiceConsuming.MainPage"
3: xmlns="http://schemas.microsoft.com/winfx/2006/xaml/presentation"
4: xmlns:x="http://schemas.microsoft.com/winfx/2006/xaml"
5: xmlns:phoneNavigation="clr-namespace:Microsoft.Phone.Controls;assembly=Microsoft.Phone.Controls.Navigation"
6: xmlns:d="http://schemas.microsoft.com/expression/blend/2008"
7: xmlns:mc="http://schemas.openxmlformats.org/markup-compatibility/2006"
8: mc:Ignorable="d" d:DesignWidth="480" d:DesignHeight="800"
9: FontFamily="{StaticResource PhoneFontFamilyNormal}"
10: FontSize="{StaticResource PhoneFontSizeNormal}"
11: Foreground="{StaticResource PhoneForegroundBrush}">;
12: <Grid x:Name="LayoutRoot" Background="{StaticResource PhoneBackgroundBrush}">
13: <;Grid.RowDefinitions>
14: <;RowDefinition Height="Auto"/>
15: <;RowDefinition Height="*"/>
16: <;/Grid.RowDefinitions>
17: <;Grid x:Name="TitleGrid" Grid.Row="0">
18: <;TextBlock Text="Windows 7 Phone" x:Name="textBlockPageTitle" Style="{StaticResource PhoneTextPageTitle1Style}"/>
19: <;TextBlock Text="Picture Gallery" x:Name="textBlockListTitle" Style="{StaticResource PhoneTextPageTitle2Style}"/>
20: <;/Grid>
21: <;Grid x:Name="ContentGrid" Grid.Row="1">
22: <;Grid.RowDefinitions>
23: <;RowDefinition Height="*" />
24: <;RowDefinition Height="3*" />
25: <;/Grid.RowDefinitions>
26: <;StackPanel Orientation="Horizontal" Margin="0,0,0,31">
27: <;Button x:Name="myButton" Height="50" Content="Get FileNames" />
28: <;ComboBox x:Name="cmbName" Height="50"
29: SelectionChanged="cmbName_SelectionChanged"
30: Margin="21,0,10,0"
31: Foreground="Black" Width="211" />;
32: </StackPanel>
33: <;Image Grid.Row="1" x:Name="myImage"
34: Height="Auto" Width="Auto"
35: ScrollViewer.HorizontalScrollBarVisibility="Auto"
36: ScrollViewer.VerticalScrollBarVisibility="Auto" />;
37: </Grid>
38: <;/Grid>
39: </phoneNavigation:PhoneApplicationPage>
MainPage.Xaml.cs
1 using System;
2 using System.Collections.Generic;
3 using System.Linq;
4 using System.Net;
5 using System.Windows;
6 using System.Windows.Controls;
7 using System.Windows.Documents;
8 using System.Windows.Input;
9 using System.Windows.Media;
10 using System.Windows.Media.Animation;
11 using System.Windows.Shapes;
12 using Microsoft.Phone.Controls;
13 using System.Xml;
14 using System.Runtime.Serialization;
15 using System.Windows.Media.Imaging;
16
17
18 namespace RESTServiceConsuming
19 {
20 public partial class MainPage : PhoneApplicationPage
21 {
22 public MainPage()
23 {
24 InitializeComponent();
25 SupportedOrientations = SupportedPageOrientation.Portrait | SupportedPageOrientation.Landscape;
26 myButton.Click += new RoutedEventHandler(myButton_Click);
27
28
29 }
30
31 void myButton_Click(object sender, RoutedEventArgs e)
32 {
33 cmbName.Items.Clear();
34 cmbName.SelectedIndex = -1;
35
36 string strUriFilesName = “http://localhost:53767/Service1.svc/getfilesName”;
37 WebClient proxy1 = new WebClient();
38 proxy1.OpenReadCompleted += new OpenReadCompletedEventHandler(proxy1_OpenReadCompleted);
39 proxy1.OpenReadAsync(new Uri(strUriFilesName));
40
41 }
42
43 void proxy1_OpenReadCompleted(object sender, OpenReadCompletedEventArgs e)
44 {
45
46 DataContractSerializer ds = new DataContractSerializer(typeof(List<string>));
47 List<string> lstFileName = (List<string>) ds.ReadObject(e.Result);
48 foreach (string file in lstFileName)
49 {
50 cmbName.Items.Add(file);
51 }
52
53 }
54
55
56 private void cmbName_SelectionChanged(object sender, SelectionChangedEventArgs e)
57 {
58
59 if (cmbName.SelectedIndex != -1)
60 {
61 string imageName = cmbName.SelectedItem.ToString();
62 WebClient proxy = new WebClient();
63 string strUriImage = “http://localhost:53767/Service1.svc/getImage/” + imageName;
64 proxy.OpenReadCompleted += new OpenReadCompletedEventHandler(proxy_OpenReadCompleted);
65 proxy.OpenReadAsync(new Uri(strUriImage));
66 }
67 }
68
69 void proxy_OpenReadCompleted(object sender, OpenReadCompletedEventArgs e)
70 {
71
72 BitmapImage img = new BitmapImage();
73 img.SetSource(e.Result);
74 myImage.Source = img;
75
76
77 }
78
79 }
80 }
Now we are ready to run our application. Press F5 and run the application in emulator. After running you will get first screen. Press button to populate the entire files name in the combo box. After selecting a particular file that image would get display as third screen.
I hope this article was informative. Happy Coding.
Discover more from Dhananjay Kumar
Subscribe to get the latest posts sent to your email.

DJ..it was really very much informative and
up to date.
Thank you..
Firoz
Thanks a lot
Thank you!!
Hi, How do we use the DirectoryInfo class in Windows Phone 7. The documentation says that it can be used only with trusted applications and so how do i make my application trusted by signing it with an appropriate cetificate. I have tried several ways of singning the .xap file with the signtool with no success. Please provide help on how do i accomplish this for development purpose.
I have created same your sample in wcf but In browser showing empty, even i passed image name too..
Hi,I try to view the Service1.svc in the browser,but the services show me endpoint not found,may I know what is the error? thank you.
I have create the Wcf services and when I want to view the Service1.svc in browser, but it shows me endpoint not found. May I know where is going wrong? I am new to this. Thank you very much
I think I am having the same problem with Mohan. May I know who can solve this? I manage to run URL http://localhost:53767/Service1.svc/GetFilesName but http://localhost:53767/Service1.svc/GetFilesName/MyImage is show endpoint not found. Please help me. Thank you
I manage to do all the step it state in the link but I have an error on
DataContractSerializer ds = new DataContractSerializer(typeof(List));
The error state that The type of namespace name ‘DataContractSerializer’ Could not be found. If I generate class on it, I will get another error which ‘RESTServiceConsuming.DataContractSerializer’ does not contain a constructor that takes 1 arguments. The ReadObject will be no definition and no extension method ‘ReadObject’ accepting a first argument of type ‘RESTServiceConsuming.DataContractSerializer’ could be found(are you missing a using directive or an assembly reference?)
I just change the interface from combo box to list box because visuo studio 2010 do not have combo box feature. May anyone expert can help me?
Finally I am able to solve the above problem I post before, but when I run the application, there is an error call “NotImplementedException was unhandled”, why I will meet this problem? Can anyone tell me the solution? Thank you very much for your kind help.
Reblogged this on molo254.
Hey there! This is the fourth time visiting now and I just wanted to say I truley relish looking at your blog site.
I have decided to bookmark it at reddit.com with your title: Picture Gallery for Windows 7 Phone using
WCF REST Service � debug mode�� and your Domain name: http://debugmode.
net/2010/04/27/picture-gallery-for-windows-7-phone-using-wcf-rest-service/.
I hope this is all right with you, I’m trying to give your wonderful blog a bit more coverage. Be back shortly.