This article will explain step by step, how to perform CRUD operation on a database using ADO.Net Data Service and then how to expose CRUD operations as REST enabled WCF service to the client. This will also give explanation, how to consume REST service at client side. This article will perform the entire HTTP verb on the service at the client Side.
Flow of the Article
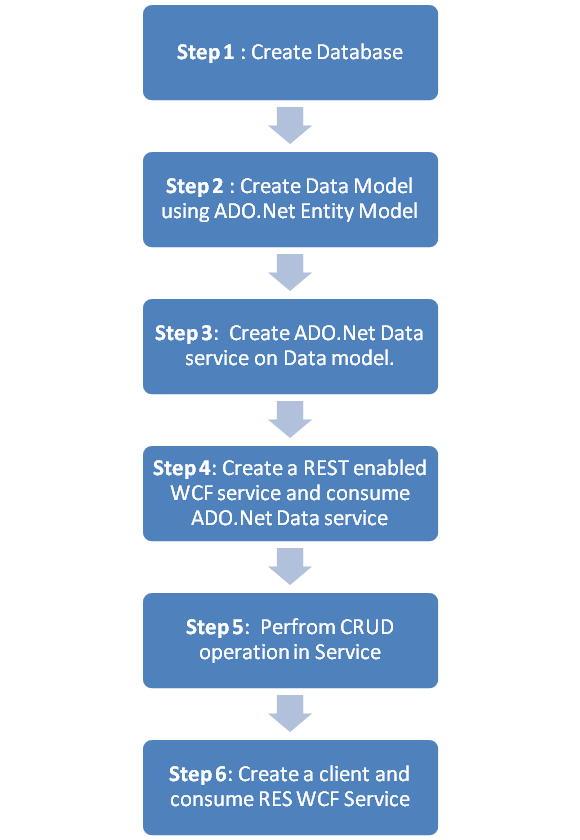
Step 1: Create Database
I have created a table named “WCF”. This table got two columns Name and EmpId. Both are of data type nvarchar. EmpId is primary key.
Step 2: Create Data Model
-
Open Visual studio, select File->New->Project->Web->ASP.Net Web Application. Give any meaningful name. I am giving name here DataService.
-
Right click on DataService project in solution explorer and Add new Item. Go to Data tab and choose ADO.Net Entity Model. Either give any meaningful name or leave the default names. I am leaving the default names for this sample. Follow the pictorial depiction below. Dj is the name of the database. WCF is the name of the table. At the end clicking Finish, Data model will get created. You will have Model1.edmx in DataService project in solution explorer.
Step 3: Create ADO.Net Data Service
Here, we will create ADO.Net Data Service on the data model; we have created in Step 2.
- Right click on DataService project in solution explorer and Add New Item. Go to Web tab and select ADO.Net Data Service option. Leave the entire default name or give as of your desire. For me, I am leaving the default names
-
Edit or modify the WebDataService1.svc.cs as below
WebDataService1.Svc.cs
|
using System; using System.Collections.Generic; using System.Data.Services; using System.Linq; using System.Web; namespace DataService { public class WebDataService1 : DataService<djEntities> { public static void InitializeService(IDataServiceConfiguration2 config) config.SetEntitySetAccessRule(“*”, EntitySetRights.All); }}} |
-
Debug the project and after successfully compilation, right click on WebDataService1.svc.cs and select View in Browser.
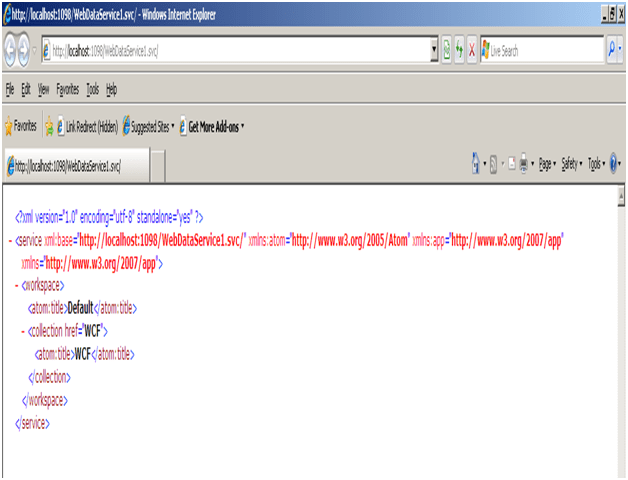
Up to here, we have created Data Model and Ado.Net Data service on that Data model and tested that.
Step 4: Create REST enabled WCF Service
- Right click on solution name in solution explorer and add a New Project by right clicking there. Select WCF Service Application. Give any name , I am giving name here RestTService.
- Delete all the default code generated. I am not changing here Contract name and Service implantation name, so it is IService1 and Service1.
- Open Web.Config file and delete all the default EndPoint setting or in other words delete System.ServiceModel code.
-
Open markup of Servic1.svc, by right clicking and selecting View markup and modify the code as below.
<%@
ServiceHost
Language=”C#”
Debug=”true”
Service=”RestService.Service1″
CodeBehind=”Service1.svc.cs”
Factory= “System.ServiceModel.Activation.WebServiceHostFactory”%> -
Now we need to create the DTO class. We will be creating this inside a class library. So to do so, add a new project in the solution of the type class library. Give it name either Businessclass or any name of your choice.
-
Add a class WCFDTO in the class library project. This class will be acting as data transfer class between REST Service and client.
WCFDTO.cs
| using System;using System.Collections.Generic;
using System.Linq; using System.Web; namespace BusinessClass |
- Compile the project.
- Now returning back to RestService. Right clcik to this project and add
- Refernece of System.ServiceModel.Web
- Project reference of BusinessClass. This class we created just now in 6th step.
- Add Service Reference of ADO.Net Data Service. This service we created in Step 3.
- We need to create a converetr class , this class will convert WCFDTO class to WCF class. Note here that WCF class is generated by Data model inm Step2. So Rest service will able to use this class to pefrom all operation because we have added service reference of the ADO.Net Data service.
- So for this right click and add a class in RestService project. Give name of this class as Converter. This is a static class. This class is having two static methods , one to convert WCF class instance to WCFDTO class instance and other class to convert WCFDTO class instance to WCF class instance.
Converter.cs
| using System;using System.Collections.Generic;
using System.Linq; using System.Web; using RestService.ServiceReference1; objdto.EmpId = obj.EmpId; objdto.Name = obj.Name; |
Now we will create the contract. Contract got 5 operations.
IService1.cs
| using System; using System.Collections.Generic; using System.Linq; using System.Runtime.Serialization; using System.ServiceModel; using System.Text; using System.ServiceModel.Web; using BusinessClass; namespace RestService { public interface IService1 [WebGet(UriTemplate=“/WCF/{empid}”)] [OperationContract] [WebGet(UriTemplate = “/WCF/”)] [OperationContract] [WebInvoke(UriTemplate=“/WCF”,Method=“POST”)] [OperationContract] [WebInvoke(UriTemplate = “/WCF”, Method = “PUT”)] [OperationContract] [WebInvoke(UriTemplate= “/WCF/{id}”, Method = “DELETE”)] |
Service implantation
Service1.cs
| using System; using System.Collections.Generic; using System.Linq; using System.Runtime.Serialization; using System.ServiceModel; using System.Text; using RestService.ServiceReference1; using BusinessClass; namespace RestService { { kpmgdemoEntities _ent ; public WCFDTO Find(string Empid) _ent = new kpmgdemoEntities(new Uri(“http://localhost:1098/WebDataService1.svc”)); WCF res = (from r in _ent.WCF where r.EmpId == Empid select r).First(); public void InsertData(WCFDTO obj) { _ent = new kpmgdemoEntities(new Uri(“http://localhost:1098/WebDataService1.svc”)); WCF insertingobject = Converter.ConvertWCFDTOtoWCF(obj); _ent.AddObject(“WCF”, insertingobject); _ent.SaveChanges(); }
_ent = new kpmgdemoEntities(new Uri(http://localhost:1098/WebDataService1.svc)); res.Name = obj.Name; _ent.UpdateObject(res);_ent.SaveChanges(); } public void DeleteData(String id) _ent = new kpmgdemoEntities(new Uri(“http://localhost:1098/WebDataService1.svc”)); WCF res = (from r in _ent.WCF where r.EmpId == id select r).First(); _ent.DeleteObject(res); _ent.SaveChanges(); } public List<WCFDTO> All() |
-
Compile and run the Service.
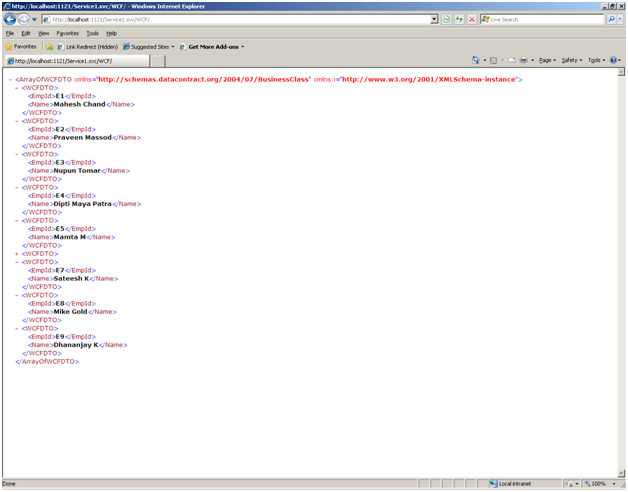
Up to this Step, we have created our REST WCF Service and tested that in the browser.
Step 5: Create client to consume the REST WCF Service
- Create a client either entirely different project or by right clicking at the solution and add new project. I am here adding in the same solution new Console project as client. In this Console Project, I am going to consume the REST WCF service.
- Add reference of Microsoft.Http.dll in the console project.
- Add project reference of BusinessClass . Such that client can understand WCFDTO class.
-
I have created a ServiceUriHelper class. This class will construct URI on which client can perform operation.
ServiceUriHelper.cs
| public static class ServiceUriHelper{static String ServiceUri; static ServiceUriHelper(){ ServiceUri = “http://localhost:1121/Service1.svc/”.Trim().TrimEnd(‘\\’); } public static String GetServiceUri(EntityAction action){ switch (action) { case EntityAction.Insert : return ServiceUri + @”WCF”; case EntityAction.Update : return ServiceUri + @”WCF”; case EntityAction.Delete: return ServiceUri + @”WCF/”; case EntityAction.Load: return ServiceUri + @”WCF/”; case EntityAction .Select : return ServiceUri + @”WCF/”; default: return String.Empty; }}} publi cenum EntityAction{ Insert =0, Update = 1, Delete = 2, Select = 3, Load = 4} |
Explanation:
-
In constructor we are initializing a variable with the base URI of the service.
ServiceUri = “http://localhost:1121/Service1.svc/”.Trim().TrimEnd(‘\\’);
In this case service is running on localhost:1121. In your case, it would be different. Just chek out in browser , while running your service and copy paste from the address bar of the browser to the here.
- Since for all operation different URI are there , so on basis of operation we are amening the service uri here in the select statement.
Insert Operation
We are calling POST method of HttpClient class. And passing serialized data contract.
| public static void InsertData(WCFDTO obj){ using (HttpResponseMessage respone = new HttpClient().Post(ServiceUriHelper.GetServiceUriEntityAction.Insert), HttpContentExtensions.CreateDataContract(obj))) { };} |
Update Operation
We are calling PUT method of HttpClient class. And passing serialized data contract.
|
public static void UpdateData(WCFDTO obj){ |
Delete Operation
We are calling DELETE method of HttpClient class. And passing serialized data on which delete is to be performed.
|
public static void DeleteData(WCFDTO obj){ { |
Select Operation
We are passing the EmpId to select the particular record. At HttpResponse message, we are getting the XML data and we desearlizing that using theresponse.content.ReadDataContract
| public static WCFDTO SelectRecord(String id){using(HttpResponseMessage response = new HttpClient().Get(ServiceUriHelper.GetServiceUri(EntityAction.Select)+id)){ return response.Content.ReadAsDataContract<WCFDTO>(); };} |
Load Operation
This method will fetch all the records from the table. Here we are desearlizing List of data contract.
| public static List<WCFDTO> GetAllRecord(){ using (HttpResponseMessage response = new HttpClient().Get(ServiceUriHelper.GetServiceUriEntityAction.Load))){ return response.Content.ReadAsDataContract<List<WCFDTO>>(); };} |
So, the entire cleint will look like
Program.cs
| using System;
using System.Collections.Generic; using System.Text; using Microsoft.ServiceModel.Web; using Microsoft.Http; using Microsoft.ServiceModel.Web.SpecializedServices; using BusinessClass; using System.Runtime.Serialization; namespace ConsoleClient { { Console.WriteLine(r.EmpId + “\t” + r.Name);} Console.Read(); obj.Name = “Rekha Singh”; InsertData(obj); switch (action){ Update = 1, Delete = 2, Load = 4 } |
Conclusion
This article explained about, building a REST ful WCF operation for CRUD operation on a table using ADO.Net Data Service. This also explained how to consume a REST service in a client.
Thank you for Reading
Discover more from Dhananjay Kumar
Subscribe to get the latest posts sent to your email.

Hi Dhananjay,
Thanks for the post. Really appreciate. I created a new application and followed the steps you had mentioned as well downloaded your sample from below link and tried it.
http://www.dotnetspark.com/kb/1597-exposing-crud-operations-as-resful-wcf-service.aspx
Either way i’m getting the below error when trying to get the list of data from DB.
Error in line 1 position 7. Expecting element ‘ArrayOfWCFDTO’ from namespace ‘http://schemas.datacontract.org/2004/07/BusinessClass’.. Encountered ‘Element’ with name ‘HTML’, namespace ”.
Also when inserting data, the code passes without any error but the database is not getting update.
Could you please let me know what might be the problem for the error. Appreciate any immediate help.
Thanks,
Yuva