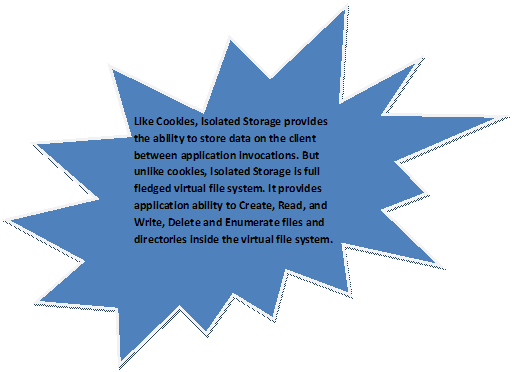
Why Isolated Storage?
SilverLight applications are partially trusted application, which are running on a sandbox environment. So, SilverLight applications are not allowed to access the file system of the client, where it is running for the security reason. Because it is not safe to allow any SilverLight application to access client computer, this may harm many important system files. Because we know some SilverLight application might be potential malicious application. And we don’t want while browsing, any harmful SilverLight application to access our file system and harm them.But some time, SilverLight application needs some restricted access to client local file system for business requirement. Like Reading and Writing user specific file at client location or saving the personal information specific to user at client side etc. So, above purpose is achieved by SilverLight application using ISOLATED STORAGE.
Cookies and Isolated Storage
Isolation
Isolated storage is composed of many different unique stores. Each of which can be thought of as its own virtual file system. This virtual file system is in isolation with the file system of operating system, such that malicious SilverLight application can not have access to the original file system.
Location of the Isolated Storage
|
Operating System |
Location |
|
| Windows VISTA | <SYSDRIVE>\Users\<user>\AppData\LocalLow\Microsoft\Silverlight\is | |
| Windows XP | <SYSDRIVE>\Document and Settings\<user>\Local Setting\Application data\Microsoft\Silver light\is |
|
SiliverLight application has access to two different stores.

SILVERLIGHT application has access of
- User + Application store
- User + Site store
Few Important points
- A SilverLight Application can access only its own application store. It cannot access store of other application.
- The Application Store is based on the, identity of the user and identity of the application.
- The identity of the application is full URL of the XAP file of the Silver light Application. For example www.c-sharpcorner.com\Application1.xap
- Application identity is case insensitive.

Sample:
This sample will demonstrate how to use with Application level setting of IsolatedStorageSetting class.
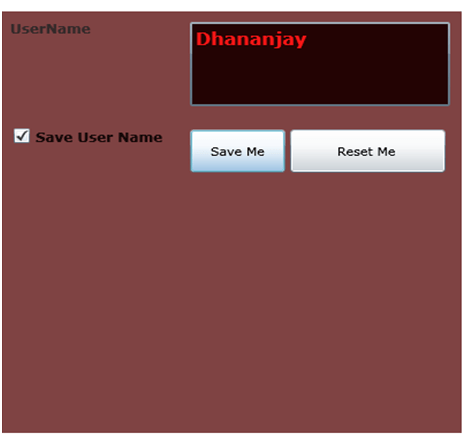
- After entering User Name is textbox , when user will click Save Me. That user name will get added in the isolated file created for the application.
- On clicking on Reset Me button value saved against UserName key, will get deleted from the isolated file.
- At each time application will loaded, saved UserName will get display in the textbox
Step 1
Create a private global variable of the type IsolatedStorageSetting for the Application level.
private IsolatedStorageSettings app = IsolatedStorageSettings.ApplicationSettings;
Step 2
On the Save button click, we will be checking if checkbox is checked, we will check whether
- UserName key is existing in App or not. If not, we will add UserName key.
- We will set value for UserName key from the user name text box.
- App.add() is used to add new key in the application.
| private void btnSave_Click(object sender, System.Windows.RoutedEventArgs e){
if (chkSave.IsChecked == true) |
Step 3
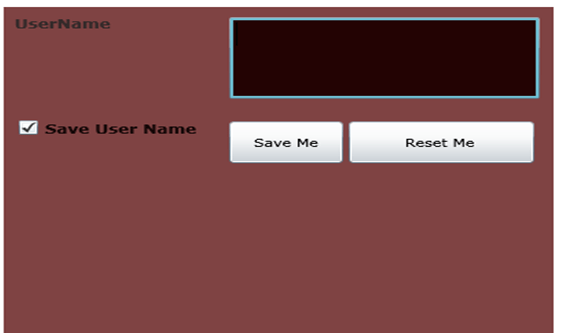
On the Reset button, we are simple removing the key from the app setting.
| private void btnReset_Click(object sender, System.Windows.RoutedEventArgs e)
{ app.Remove(“UserName”); txtUname.Text = “”;} |
Step 4
On the Page Load, I am displaying the saved value for the key UserName from the isolated storage.
| void MainPage_Loaded(object sender, RoutedEventArgs e){
if (app.Contains(“UserName”)) |
So, the complete code is as below,
MainPage.Xaml
| <UserControl x:Class=”IsolatedStorageSample1.MainPage” xmlns=http://schemas.microsoft.com/winfx/2006/xaml/presentation xmlns:x=http://schemas.microsoft.com/winfx/2006/xaml Width=”Auto” Height=”Auto”> <Grid x:Name=”LayoutRoot” Background=”#FF7F4343″ Width=”400″ Height=”400″> <Grid.ColumnDefinitions> <RowDefinition Height=”0.25*”/> <Grid.ColumnDefinitions> <ColumnDefinition Width=”0.385*”/> <Button x:Name=”btnSave” Margin=”2,2,2,2″ Content=”Save Me” Grid.Row=”0″ Grid.Column=”0″ Click=”btnSave_Click”/> <Button x:Name=”btnReset” Margin=”2,2,2,2″ Content=”Reset Me “ Grid.Row=”0″ Grid.Column=”1″ Click=”btnReset_Click”/> |
MainPage.Xaml.cs
| using System; using System.Collections.Generic; using System.Linq; using System.Net; using System.Windows; using System.Windows.Controls; using System.Windows.Documents; using System.Windows.Input; using System.Windows.Media; using System.Windows.Media.Animation; using System.Windows.Shapes; using System.IO.IsolatedStorage; namespace IsolatedStorageSample1{ InitializeComponent(); { txtUname.Text = “”;}}} |
Output:
After clicking Refresh again we will get the same output. If we click Reset and then press F5, we will get output as below.
Quota in Isolated Storage
- A quota is limit on the amount of isolated storage space that can be used by the application.
- A Quota Group is group of isolated Store that shares the same quota.
- In Silver Light, stores are grouped by the site. So all the application with same site identity shares the same quota.
-
Isolated Storage could have zero or more quota groups.

-
An Application can request more space for the quota group

- Sample on how to modify the quota?
I have added the below code on the click event of Save Button. So now the save Button click event is as below. I have modified the above code sample. See the code in Red rectangle.
| private void btnSave_Click(object sender, System.Windows.RoutedEventArgs e){
if (chkSave.IsChecked == true){ |
Output
User is getting prompt for Approval.
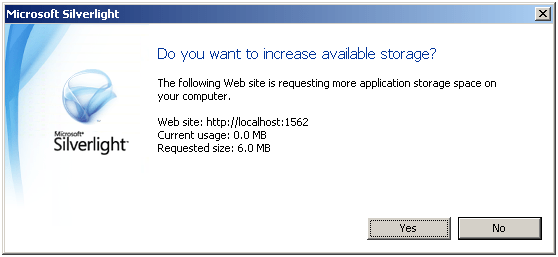
When User is not approving means selecting “No”. The default size is getting displayed in message box.
When User is approving means selecting “Yes”. The increased size is getting displayed in message box.
Discover more from Dhananjay Kumar
Subscribe to get the latest posts sent to your email.
