Objective
In this article, I will explain how to put Radio Button as one of the column in Silver Light Data Grid. I will also show how to work with radio button as column of Data Grid.
Procedure
Create a Silver Light application by File -> New -> Project -> SilverLight then selecting Silver Light Application project template.
Host the SilverLightApplication1 in Web Application
Design the Silver Light page (XAML)
Add Data Grid as below and a text box as below. To add Data Grid, drag and drop data grid from toolbox on Silver Light page.
<UserControl xmlns:data=”clr-namespace:System.Windows.Controls;assembly=System.Windows.Controls.Data”
x:Class=”SilverlightApplication1.MainPage”
xmlns=”http://schemas.microsoft.com/winfx/2006/xaml/presentation”
xmlns:x=”http://schemas.microsoft.com/winfx/2006/xaml”
xmlns:d=”http://schemas.microsoft.com/expression/blend/2008″ xmlns:mc=”http://schemas.openxmlformats.org/markup-compatibility/2006″
mc:Ignorable=”d” d:DesignWidth=”640″ d:DesignHeight=”480″>
<Grid x:Name=”LayoutRoot” Background=”Azure”>
<Grid.RowDefinitions>
<RowDefinition Height=”400″/>
<RowDefinition Height=”*” />
</Grid.RowDefinitions>
<TextBlock x:Name=”txtDisplay” Grid.Row=”0″ Height=”100″ Width=”300″ />
<data:DataGrid Grid.Row=”1″ Height=”auto” Width=”auto” AutoGenerateColumns=”False” AlternatingRowBackground=”azue” CanUserResizeColumns=”False”>
</data:DataGrid>
</Grid>
</UserControl>
Add Reference
Add below references in Silver Light Application
System.Windows.Control
System.Windows.Control.Data.Input
Now add below namespace on Silver Light page (XAML). You could give any namespace name instead of basic.
xmlns:basic=”clr-namespace:System.Windows.Controls;assembly=System.Windows”
xmlns:dataInput=”clr-namespace:System.Windows.Controls;assembly=System.Windows.Controls.Data.Input”
After adding the above namespace, the namespace section of XAML should look like below
<UserControl xmlns:data=”clr-namespace:System.Windows.Controls;assembly=System.Windows.Controls.Data”
xmlns=”http://schemas.microsoft.com/winfx/2006/xaml/presentation”
xmlns:x=”http://schemas.microsoft.com/winfx/2006/xaml”
xmlns:d=”http://schemas.microsoft.com/expression/blend/2008″ xmlns:mc=”http://schemas.openxmlformats.org/markup-compatibility/2006″
xmlns:basic =”clr-namespace:System.Windows.Controls;assembly=System.Windows”
mc:Ignorable=”d” xmlns:dataInput=”clr-namespace:System.Windows.Controls;assembly=System.Windows.Controls.Data.Input”
x:Class=”SilverlightApplication1.MainPage”
d:DesignWidth=”640″ d:DesignHeight=”480″>
Adding Radio Button in Data Grid
To add Radio Button
- Add Data Grid Template column in Data Grid
- Inside Data Grid Template column add a cell template
- Inside cell template add Data Template
- Inside Data Template add any control you want to add. We are adding Radio Button here.
- Set the properties of Radio Button.
- Add SelectionChanged event handler to Data Grid
- Binding other two text column of Data Grid with other properties.
<data:DataGrid x:Name=”myDataGrid” Grid.Row=”1″ Height=”auto” Margin=”20,20,20,20″ IsReadOnly=”True” Width=”auto” AutoGenerateColumns=”False” AlternatingRowBackground=”azure” CanUserResizeColumns=”False” SelectionChanged=”myDataGrid_SelectionChanged”>
<data:DataGrid.Columns>
<data:DataGridTemplateColumn Header=”RadioButtons”>
<data:DataGridTemplateColumn.CellTemplate>
<DataTemplate>
<RadioButton x:Name=”rdbIndataGrid” IsChecked=”false” GroupName=”myGroup” />
</DataTemplate>
</data:DataGridTemplateColumn.CellTemplate>
</data:DataGridTemplateColumn>
<data:DataGridTextColumn Header=”Name” Binding=”{Binding Name}” />
<data:DataGridTextColumn Header=”Number Of Article” Binding=”{Binding Articles}” />
</data:DataGrid.Columns>
</data:DataGrid>
Complete code for MainPage.Xaml
<UserControl xmlns:data=”clr-namespace:System.Windows.Controls;assembly=System.Windows.Controls.Data”
xmlns=”http://schemas.microsoft.com/winfx/2006/xaml/presentation”
xmlns:x=”http://schemas.microsoft.com/winfx/2006/xaml”
xmlns:d=”http://schemas.microsoft.com/expression/blend/2008″ xmlns:mc=”http://schemas.openxmlformats.org/markup-compatibility/2006″
xmlns:basic =”clr-namespace:System.Windows.Controls;assembly=System.Windows”
mc:Ignorable=”d” xmlns:dataInput=”clr-namespace:System.Windows.Controls;assembly=System.Windows.Controls.Data.Input”
x:Class=”SilverlightApplication1.MainPage”
d:DesignWidth=”640″ d:DesignHeight=”480″>
<Grid x:Name=”LayoutRoot” Background=”Azure”>
<Grid.RowDefinitions>
<RowDefinition Height=”50″/>
<RowDefinition Height=”*” />
</Grid.RowDefinitions>
<TextBox
x:Name=”txtDisplay” Grid.Row=”0″ Height=”100″ Width=”300″ Text=”This is Dhananjay” />
<data:DataGrid x:Name=”myDataGrid” Grid.Row=”1″ Height=”auto” Margin=”20,20,20,20″ IsReadOnly=”True” Width=”auto” AutoGenerateColumns=”False” AlternatingRowBackground=”azure” CanUserResizeColumns=”False” SelectionChanged=”myDataGrid_SelectionChanged”>
<data:DataGrid.Columns>
<data:DataGridTemplateColumn Header=”RadioButtons”>
<data:DataGridTemplateColumn.CellTemplate>
<DataTemplate>
<RadioButton x:Name=”rdbIndataGrid” IsChecked=”false” GroupName=”myGroup” />
</DataTemplate>
</data:DataGridTemplateColumn.CellTemplate>
</data:DataGridTemplateColumn>
<data:DataGridTextColumn Header=”Name” Binding=”{Binding Name}” />
<data:DataGridTextColumn Header=”Number Of Article” Binding=”{Binding Articles}” />
</data:DataGrid.Columns>
</data:DataGrid>
</Grid>
</UserControl>
Binding the Data Grid
private
void GetData()
{
Service1Client Proxy = new
Service1Client();
ObservableCollection<Author> authors = new
ObservableCollection<Author>();
Proxy.DisplayAuthorCompleted += (sender, e) =>
{
ObservableCollection<ServiceReference1.Author> obj = new
ObservableCollection<ServiceReference1.Author>();
obj = e.Result;
myDataGrid.ItemsSource = obj;
};
Proxy.DisplayAuthorAsync();
}
Checking Radio Button is checked or not
- Create a Radio Button reference by getting row column from Data Grid.
- Checking whether Radio button is checked or not.
- If checked, text box content is getting set with name of the author.
private
void myDataGrid_SelectionChanged(object sender, SelectionChangedEventArgs e)
{
ServiceReference1.Author author;
RadioButton r = myDataGrid.Columns[0].GetCellContent(this.myDataGrid.SelectedItem) as
RadioButton;
if(r.IsChecked == true)
{
author = myDataGrid.SelectedItem as ServiceReference1.Author;
txtDisplay.Text = author.Name;
}
Complete code for MainPage.Xaml.cs
using System;
using System.Collections.Generic;
using System.Linq;
using System.Net;
using System.Windows;
using System.Windows.Controls;
using System.Windows.Documents;
using System.Windows.Input;
using System.Windows.Media;
using System.Windows.Media.Animation;
using System.Windows.Shapes;
using SilverlightApplication1.ServiceReference1;
using System.Collections.ObjectModel;
namespace SilverlightApplication1
{
public
partial
class
MainPage : UserControl
{
public MainPage()
{
InitializeComponent();
GetData();
}
private
void GetData()
{
Service1Client Proxy = new
Service1Client();
ObservableCollection<Author> authors = new
ObservableCollection<Author>();
Proxy.DisplayAuthorCompleted += (sender, e) =>
{
ObservableCollection<ServiceReference1.Author> obj = new
ObservableCollection<ServiceReference1.Author>();
obj = e.Result;
myDataGrid.ItemsSource = obj;
};
Proxy.DisplayAuthorAsync();
}
private
void myDataGrid_SelectionChanged(object sender, SelectionChangedEventArgs e)
{
ServiceReference1.Author author;
RadioButton r = myDataGrid.Columns[0].GetCellContent(this.myDataGrid.SelectedItem) as
RadioButton;
if(r.IsChecked == true)
{
author = myDataGrid.SelectedItem as ServiceReference1.Author;
txtDisplay.Text = author.Name;
}
}
}
}
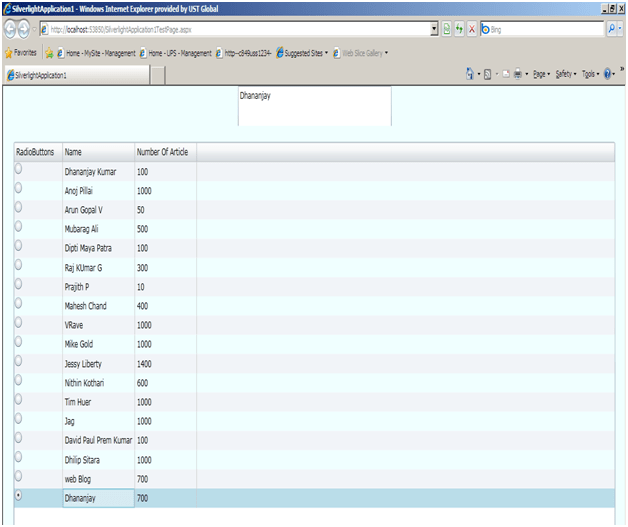
Output
Service
- We are calling a WCF service.
- This is hosted in same web application where Silver Light application is hosted.
- There is one Data Contract is there. Name of the Data Contract is Author.
Service1.svc.cs
using System;
using System.Linq;
using System.Runtime.Serialization;
using System.ServiceModel;
using System.ServiceModel.Activation;
using System.Collections.Generic;
using System.Text;
namespace TestingProgressBar
{
[ServiceContract(Namespace = “”)]
[AspNetCompatibilityRequirements(RequirementsMode = AspNetCompatibilityRequirementsMode.Allowed)]
public
class
Service1
{
[OperationContract]
public
List<Author> DisplayAuthor()
{
List<Author> result = new
List<Author>();
result.Add(new
Author() { Name = “Dhananjay Kumar “, Articles = “100” });
result.Add(new
Author() { Name = “Anoj Pillai “, Articles = “1000” });
result.Add(new
Author() { Name = “Arun Gopal V “, Articles = “50” });
result.Add(new
Author() { Name = “Mubarag Ali “, Articles = “500” });
result.Add(new
Author() { Name = “Dipti Maya Patra “, Articles = “100” });
result.Add(new
Author() { Name = “Raj KUmar G “, Articles = “300” });
result.Add(new
Author() { Name = “Prajith P “, Articles = “10” });
result.Add(new
Author() { Name = “Mahesh Chand “, Articles = “400” });
result.Add(new
Author() { Name = “VRave “, Articles = “1000” });
result.Add(new
Author() { Name = “Mike Gold “, Articles = “1000” });
result.Add(new
Author() { Name = “Jessy Liberty “, Articles = “1400” });
result.Add(new
Author() { Name = “Nithin Kothari”, Articles = “600” });
result.Add(new
Author() { Name = “Tim Huer”, Articles = “1000” });
result.Add(new
Author() { Name = “Jag “, Articles = “1000” });
result.Add(new
Author() { Name = “David Paul Prem Kumar”, Articles = “100” });
result.Add(new
Author() { Name = “Dhilip Sitara “, Articles = “1000” });
result.Add(new
Author() { Name = “web Blog”, Articles = “700” });
result.Add(new
Author() { Name = “Dhananjay “, Articles = “700” });
return result ;
}
}
[DataContract]
public
class
Author
{
[DataMember]
public
String Name { get; set; }
[DataMember]
public
String Articles { get; set; }
}
}
Conclusion
In this article, we saw how to work with Radio Button in Silver Light Data Grid. Thanks for reading. I hope it was useful.
Discover more from Dhananjay Kumar
Subscribe to get the latest posts sent to your email.
