- Site Definitions are the foundations on which all sites and user templates are built.
- Site Definition is collection ox XML and .aspx file.
- Site Definitions are predefined components needs to be included when a site was created in SharePoint server.
- Site Definition contains information of Web Part , Lists, Features and navigation bars to be included in the site.
- Customizing Portal Sites and other SharePoint sites using Site Definition is most appropriate for third party developer and SharePoint Administrator.
- Site Definitions requires access to a file system of the Web Server.
- Server administrator must be also involved in deployment of Site Definitions.
- Custom Site Definitions are Version and Upgrade independent.
- Subsequent upgrades to SharePoint products and technologies may overwrite existing Site Definitions. Using Custom Site definition exclude site from potential upgrade issues.
- To avoid Unghosting , Custom Site Definition is to be create.
- There are two options to create it
- Create New Site Definition File : Either Start from Scratch and create files one by one or Copy an existing Site Definition and modify it.
2. Copy a Site Definition and change it in Visual Studio: We can make copy an existing site definition and modify it in visual studio to create new site definition.
-
The configuration of this site definitions are defined in XML file which is available in
C:\Program Files\Common Files\Microsoft Shared\web server extensions\12\TEMPLATE\1033\XML folder.
-
In the file system these definitions are available in C:\Program Files\Common Files\Microsoft Shared\web server extensions\12\TEMPLATE\Site Templates.
- Each of these site definitions consists a XML folder and a Home page (default.aspx).
- Each of these site definitions consists a XML folder and a Home page (default.aspx).
Steps to create custom Site Definition
- Log on as an administrator
-
Browse to C:\Program Files\Common Files\Microsoft Shared\web server extensions\12\TEMPLATE\SiteTemplates.
Copy STS folder-> Paste it at same place -> Rename it as TIGER.
- Open the folder Tiger
- Search for default.aspx
- Open default.aspx in notepad.
-
Modify code. Here we need to add code for site definition.
Default.aspx
Version=12.0.0.0, Culture=neutral, PublicKeyToken=71e9bce111e9429c” %>
<asp:Content ContentPlaceHolderId=”PlaceHolderPageTitle” runat=”server”>
EncodeMethod=”HtmlEncode”/> – <SharePoint:ProjectProperty Property=”Title” runat=”server”/>
</asp:Content>
SRC=”/_layouts/images/blank.gif” width=1 height=1 alt=””></asp:Content>
<asp:Content ContentPlaceHolderId=”PlaceHolderPageTitleInTitleArea” runat=”server”>
runat=”server”/></label>
</asp:Content>
<asp:Content ContentPlaceHolderId=”PlaceHolderTitleBreadcrumb” runat=”server”/>
<asp:Content ContentPlaceHolderId=”PlaceHolderTitleAreaClass” runat=”server”>
<style type=”text/css”>
TD.ms-titleareaframe, .ms-pagetitleareaframe {
height: 10px;
}
Div.ms-titleareaframe {
height: 100%;
}
.ms-pagetitleareaframe table {
background: none;
height: 10px;
}
</style>
</asp:Content>
<asp:Content ContentPlaceHolderId=”PlaceHolderAdditionalPageHead” runat=”server”>
<META Name=”CollaborationServer” Content=”SharePoint Team Web Site”>
<script type=”text/javascript”>
var navBarHelpOverrideKey = “wssmain”;
</script>
</asp:Content>
<asp:Content ContentPlaceHolderId=”PlaceHolderSearchArea” runat=”server”>
<SharePoint:DelegateControl runat=”server”
ControlId=”SmallSearchInputBox” />
</asp:Content>
<asp:Content ContentPlaceHolderId=”PlaceHolderLeftActions” runat=”server”>
</asp:Content>
<asp:Content ContentPlaceHolderId=”PlaceHolderPageDescription” runat=”server”/>
<asp:Content ContentPlaceHolderId=”PlaceHolderBodyAreaClass” runat=”server”>
<style type=”text/css”>
.ms-bodyareaframe {
padding: 0px;
}
</style>
</asp:Content>
<asp:Content ContentPlaceHolderId=”PlaceHolderMain” runat=”server”>
<table cellspacing=”0″ border=”0″ width=”100%”>
<tr>
<td class=”ms-pagebreadcrumb”>
NodeStyle-CssClass=”ms-sitemapdirectional” runat=”server”/>
</td>
</tr>
<tr>
runat=”server”/></td>
</tr>
<tr>
<td>
<table width=”100%” cellpadding=0 cellspacing=0 style=”padding: 5px 10px 10px 10px;”>
<tr>
<td valign=”top” width=”100%” colspan=”3″>
<WebPartPages:WebPartZone runat=”server” FrameType=”TitleBarOnly” ID=”Top” Title=”loc:Top” />
</td>
</tr>
<tr>
<td valign=”top” width=”70%”>
Title=”loc:Left” />
</td>
<td> </td>
<td valign=”top” width=”30%”>
Title=”loc:Right” />
</td>
<td> </td>
</tr>
</table>
</td>
</tr>
<tr>
<td valign=”top” width=”100%” colspan=”3″>
Title=”loc:Bottom” />
</td>
</tr>
</table>
</asp:Content>
- Register new site definition to SharePoint.
-
Open the folder
C:\Program Files\Common Files\Microsoft Shared\web server extensions\12\TEMPLATE\1033\XML
- Copy the file WEBTEMP.XML and save it as WEBTEMPTIGER.xml. here make a note that , we need to append name of folder which we created in step 2 ( in this case it is tiger) to WEBTEMP. So here name would be WEBTEMPTIGER.xml
- Open WEBTEMPTIGER.XML in notepad and replace it with following content.
<?xml version=”1.0″ encoding=”utf-8″?>
<!– _lcid=”1033″ _version=”12.0.4518″ _dal=”1″ –>
<!– _LocalBinding –>
<Templates xmlns:ows=”Microsoft SharePoint”>
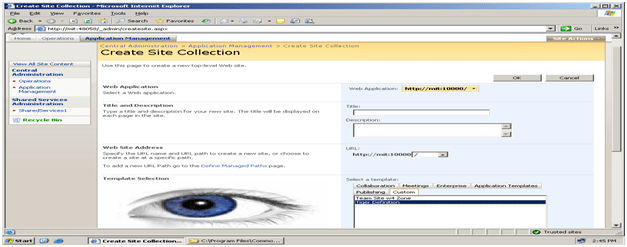
<Template Name=”TIGER” ID=”10009″>
<Configuration ID=”1″ Title=”Tiger Definition” Hidden=”FALSE” ImageUrl=”/_layouts/images/Eye.GIF” Description=”Tiger Site.” DisplayCategory=”Custom” AllowGlobalFeatureAssociations=”False” > </Configuration>
</Template>
</Templates>
Make sure here ID should be greater than 10000. It must not collide with id of any other Site Definition.
- Restart IIS. Go to Start->Run->IISRESET
- Now you would be able to see this Site Definition inside Custom category.
Happy Coding
Discover more from Dhananjay Kumar
Subscribe to get the latest posts sent to your email.
