Objective
The Core purpose of this article is demonstrated to perform CRUD operation on a database in ASP.NET MVC Framework.
See my other articles on ASP.NET MVC Framework to , get an understanding of different components of framework.
My articles could be found
SilverLight in MVC Framework here
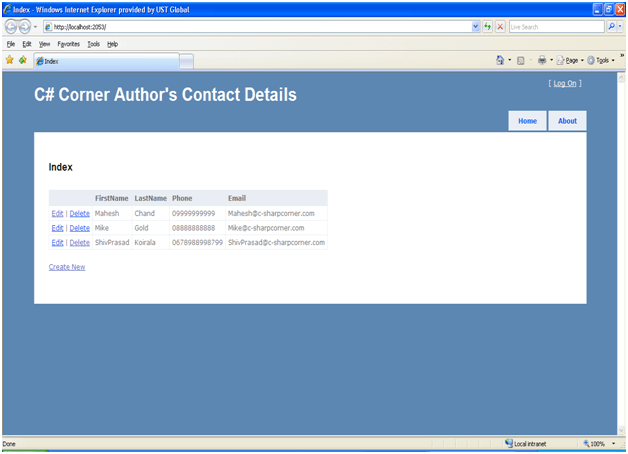
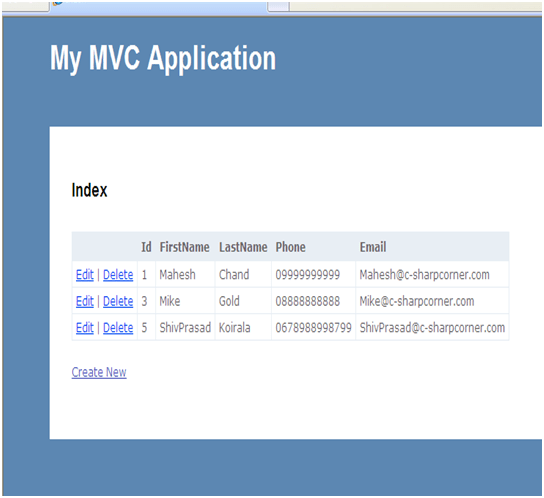
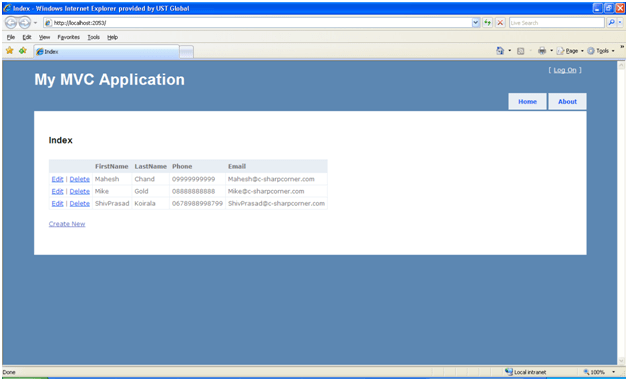
Final Output would be something like
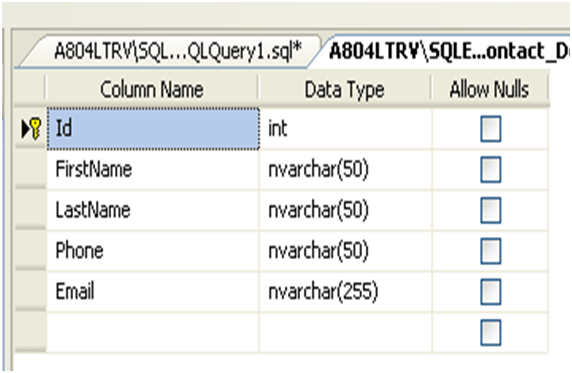
Data Base Description
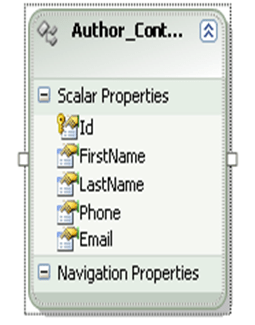
- I have created one database called ContactDetails in SQL Server 2008.
- ContactDetails databse contains one table called Author_Contact_Details
- Id is a primary key and its (Is Identity) property is set to the value Yes.
Note: Database script is being attached to download. So either you could run that database script or you could create the database manually by yourself.
Creating MVC application
- Open visual studio and create new Project -> Web -> Asp.Net Mvc Application.
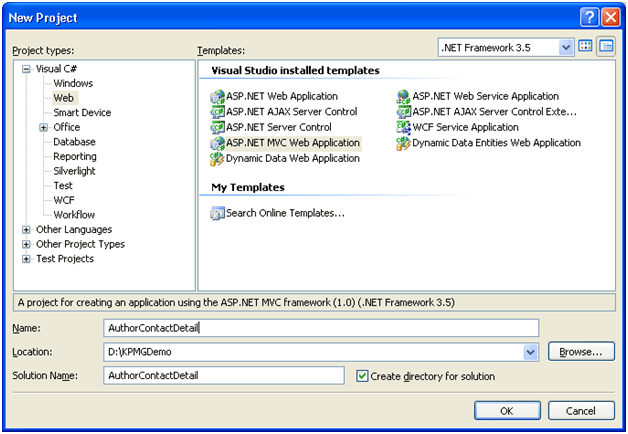
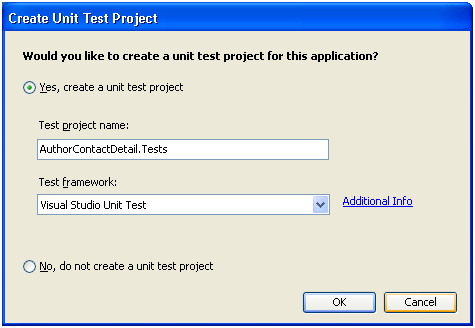
- Create UNIT Test project as well. We will do unit testing on our project later in this article or next series of this article.
- After creating application Solution Explorer will look like below. It would contain Model,
View and Controller folders.
-
There will be one more project in solution for Unit Testing.
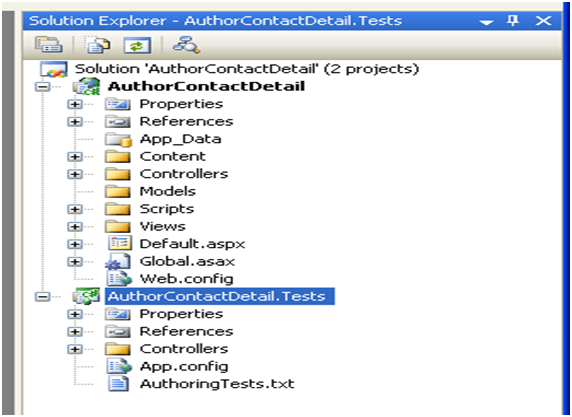
-
Delete the following files from the ASP.NET MVC project
\Controllers\HomeController.cs
\Views\Home\About.aspx
\Views\Home\Index.aspx
- And delete the following file from the Test project
\Controllers\HomeControllerTest.cs
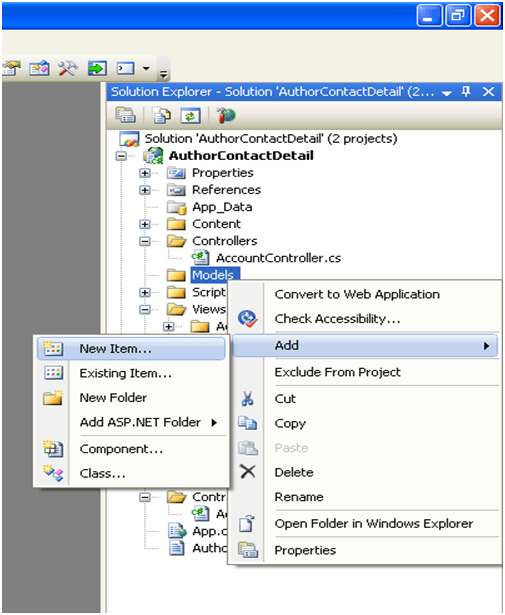
Creating the Data Model
-
Right click on Models and add New Item
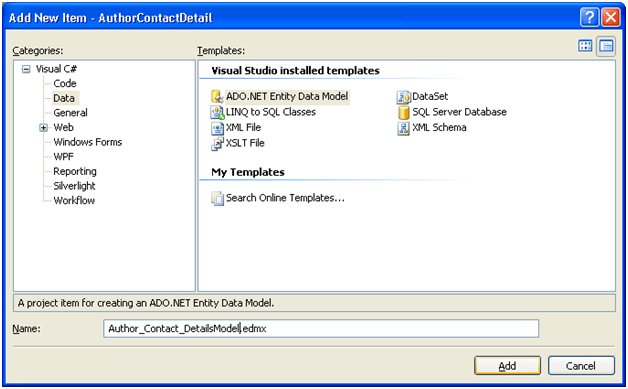
- From Data tab select Ado.Net Entity data model.
- Give any meaningful name for .edmx . Here name is Author_Contact_DetailsModel.
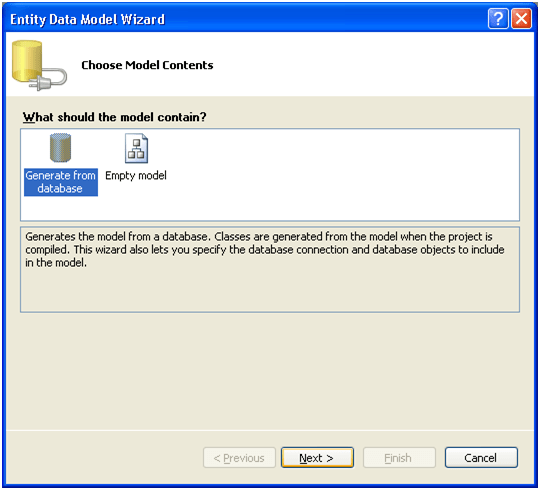
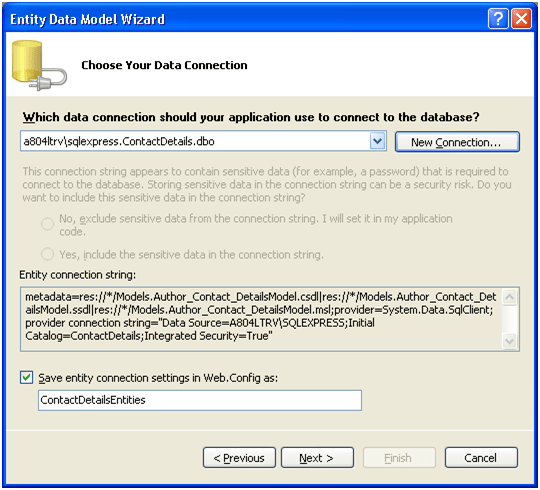
- Select Generate from Database.
- Choose Data Source name. Choose Server Name. Select Data Base.
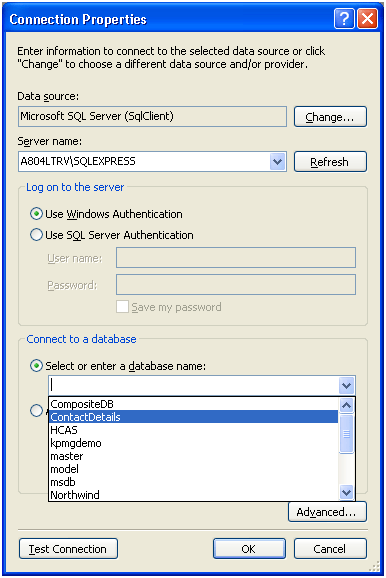
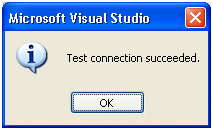
- Click on Test Connection to check the connection.
- Give Connection string name and click next. Here connection string name is ContactDetailsEntities.
- Select table and give model namespace name. Here model namespace name is ContactDetailsModel
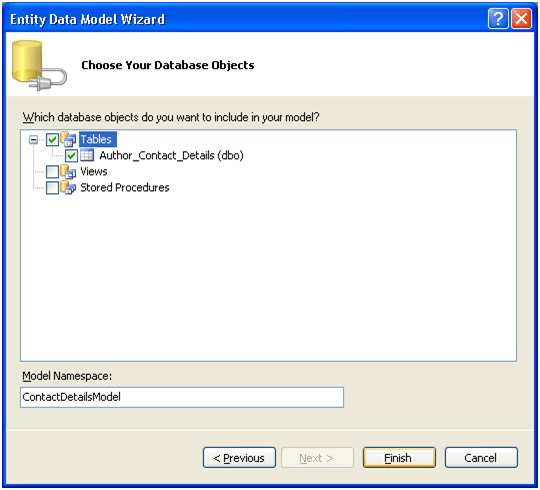
At this point, we have created our database model. We can use the Author_Contact_Details class to represent a particular contact record in our database.
Creating the Home Controller
- Right click on Controller and select Add Controller.

-
Give Controller name. Controller name must be post fixed by Controller . Here name is
HomeController. You cannot give any name. Controller name must followed by Controller.
- Checked the box to add action methods for Create , Update and Delete

When you create the Home controller, you get the class like below
Controller\HomeController.cs
using System;
using System.Collections.Generic;
using System.Linq;
using System.Web;
using System.Web.Mvc;
using System.Web.Mvc.Ajax;
namespace AuthorContactDetail.Controllers
{
public
class
HomeController : Controller
{
//
// GET: /Home/
public
ActionResult Index()
{
return View();
}
//
// GET: /Home/Details/5
public
ActionResult Details(int id)
{
return View();
}
//
// GET: /Home/Create
public
ActionResult Create()
{
return View();
}
//
// POST: /Home/Create
[AcceptVerbs(HttpVerbs.Post)]
public
ActionResult Create(FormCollection collection)
{
try
{
// TODO: Add insert logic here
return RedirectToAction(“Index”);
}
catch
{
return View();
}
}
//
// GET: /Home/Edit/5
public
ActionResult Edit(int id)
{
return View();
}
//
// POST: /Home/Edit/5
[AcceptVerbs(HttpVerbs.Post)]
public
ActionResult Edit(int id, FormCollection collection)
{
try
{
// TODO: Add update logic here
return RedirectToAction(“Index”);
}
catch
{
return View();
}
}
}
}
Modify the Index Action
to return all the record from the table.
private
ContactDetailsEntities _entities = new
ContactDetailsEntities();
public
ActionResult Index()
{
return View(_entities.Author_Contact_Details.ToList());
}
Note: _entities is initialized globally.
- Now that we’ve created the Index controller, we next need to create the Index view. Before creating the Index view, compile application by selecting the menu option Build, Build Solution. You should always compile your project before adding a view in order for the list of model classes to be displayed in the Add View dialog.
- Right click at Index and select Add View
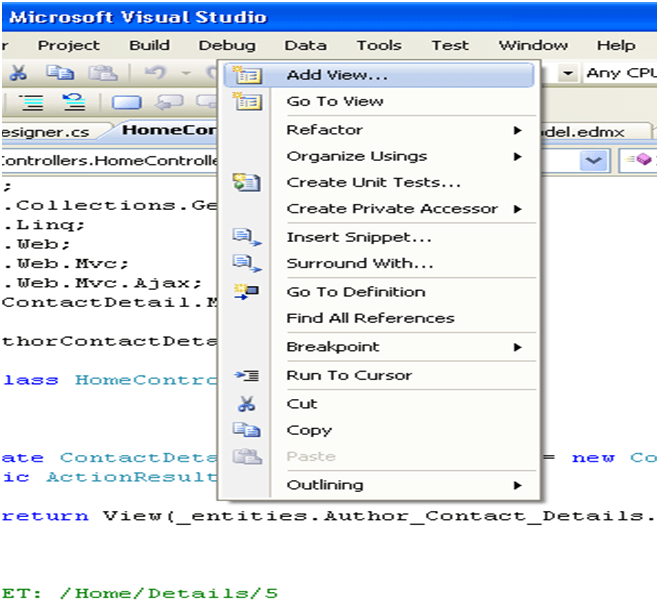
- Select Create a Strongly typed view. From View data class select name of the table and in View content select List.

- Un modified Index.aspx will look like below
Views\Home\Index.aspx (unmodified)
<%@
Page
Title=””
Language=”C#”
MasterPageFile=”~/Views/Shared/Site.Master”
Inherits=”System.Web.Mvc.ViewPage<IEnumerable<AuthorContactDetail.Models.Author_Contact_Details>>”
%>
<asp:Content
ID=”Content1″
ContentPlaceHolderID=”TitleContent”
runat=”server”>
Index
</asp:Content>
<asp:Content
ID=”Content2″
ContentPlaceHolderID=”MainContent”
runat=”server”>
<h2>Index</h2>
<table>
<tr>
<th></th>
<th>
Id
</th>
<th>
FirstName
</th>
<th>
LastName
</th>
<th>
Phone
</th>
<th>
Email
</th>
</tr>
<%
foreach (var item in Model) { %>
<tr>
<td>
<%= Html.ActionLink(“Edit”, “Edit”, new { id=item.Id }) %> |
<%— <%= Html.ActionLink(“Details”, “Details”, new { id=item.Id })%>–%>
</td>
<td>
<%= Html.Encode(item.Id) %>
</td>
<td>
<%= Html.Encode(item.FirstName) %>
</td>
<td>
<%= Html.Encode(item.LastName) %>
</td>
<td>
<%= Html.Encode(item.Phone) %>
</td>
<td>
<%= Html.Encode(item.Email) %>
</td>
</tr>
<% } %>
</table>
<p>
<%= Html.ActionLink(“Create New”, “Create”) %>
</p>
</asp:Content>
Note: Here, Details Link in commented, because we don’t have any details of record.
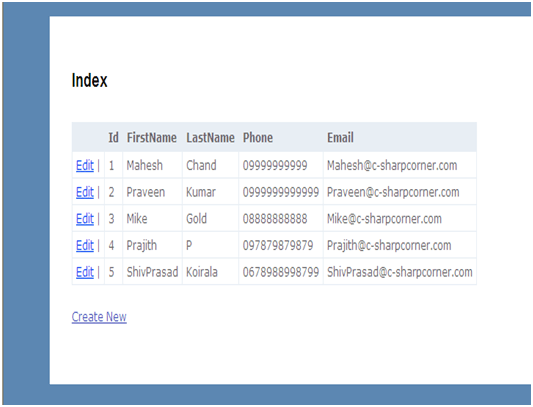
Just press F5 to run with debugging.
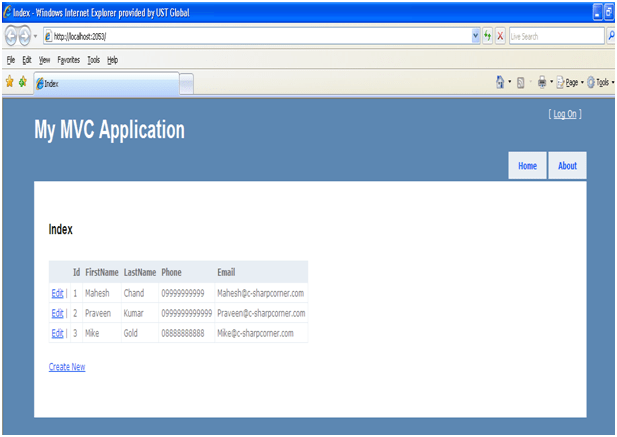
Creating New Contacts
If you see at
Controller\HomeController.cs
, for create you will find below to actions.
// GET: /Home/Create
public
ActionResult Create()
{
return View();
}
//
// POST: /Home/Create
[AcceptVerbs(HttpVerbs.Post)]
public
ActionResult Create(FormCollection collection)
{
try
{
// TODO: Add insert logic here
return RedirectToAction(“Index”);
}
catch
{
return View();
}
}
//
// GET: /Home/Edit/5
-
First Create() action that returns an HTML form for creating a new contact
-
Second Create () action is performing actual insertion into table.
- First Create () action is attributed with HTTP GET verb. So it would return HTML page.
-
Second Create () action is attributed with HTTP POST verb. So it would post data in database.
-
Second Create () action could only be called while posting the HTML form.
-
We need to modify second Create action to perform actual Insertion into database.
public
ActionResult Create()
{
return View();
}
//
// POST: /Home/Create
[AcceptVerbs(HttpVerbs.Post)]
public
ActionResult Create([Bind(Exclude=“Id”)] Author_Contact_Details contactDetail)
{
if (!ModelState.IsValid)
return View();
try
{
// TODO: Add insert logic here
_entities.AddToAuthor_Contact_Details(contactDetail);
_entities.SaveChanges();
return RedirectToAction(“Index”);
}
catch
{
return View();
}
}
- Right click on either of the Create action and add Create View
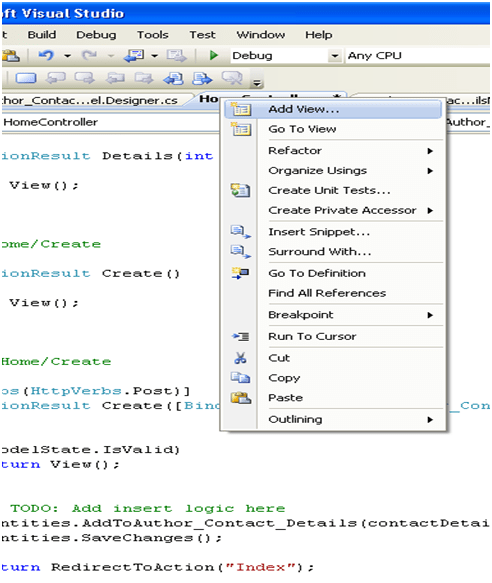
-
Select Create a Strongly Typed View and in View Content select Create
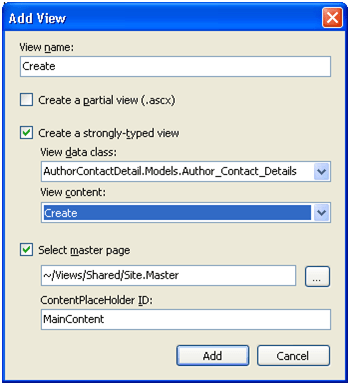
-
Create.aspx file will get created in View/Home. The .aspx will look like below
View/Home/Create.aspx
<%@
Page
Title=””
Language=”C#”
MasterPageFile=”~/Views/Shared/Site.Master”
Inherits=”System.Web.Mvc.ViewPage<AuthorContactDetail.Models.Author_Contact_Details>”
%>
<asp:Content
ID=”Content1″
ContentPlaceHolderID=”TitleContent”
runat=”server”>
Create
</asp:Content>
<asp:Content
ID=”Content2″
ContentPlaceHolderID=”MainContent”
runat=”server”>
<h2>Create</h2>
<%= Html.ValidationSummary(“Create was unsuccessful. Please correct the errors and try again.”) %>
<%
using (Html.BeginForm()) {%>
<fieldset>
<legend>Fields</legend>
<p>
<label
for=”Id”>Id:</label>
<%= Html.TextBox(“Id”) %>
<%= Html.ValidationMessage(“Id”, “*”) %>
</p>
<p>
<label
for=”FirstName”>FirstName:</label>
<%= Html.TextBox(“FirstName”) %>
<%= Html.ValidationMessage(“FirstName”, “*”) %>
</p>
<p>
<label
for=”LastName”>LastName:</label>
<%= Html.TextBox(“LastName”) %>
<%= Html.ValidationMessage(“LastName”, “*”) %>
</p>
<p>
<label
for=”Phone”>Phone:</label>
<%= Html.TextBox(“Phone”) %>
<%= Html.ValidationMessage(“Phone”, “*”) %>
</p>
<p>
<label
for=”Email”>Email:</label>
<%= Html.TextBox(“Email”) %>
<%= Html.ValidationMessage(“Email”, “*”) %>
</p>
<p>
<input
type=”submit”
value=”Create”
/>
</p>
</fieldset>
<% } %>
<div>
<%=Html.ActionLink(“Back to List”, “Index”) %>
</div>
</asp:Content>
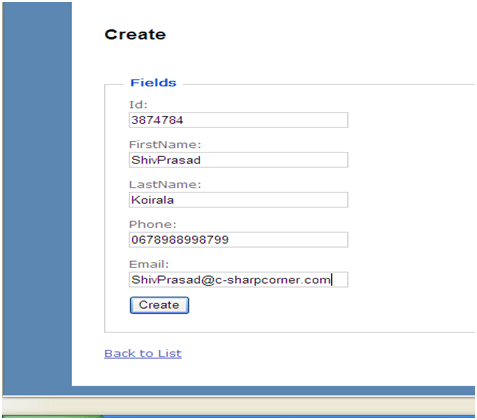
Just press F5 to run with debugging.
Editing Contacts
If you see at Controller\HomeController.cs , for edit you will find below to actions.
// GET: /Home/Edit/5
public
ActionResult Edit(int id)
{
return View();
}
//
// POST: /Home/Edit/5
[AcceptVerbs(HttpVerbs.Post)]
public
ActionResult Edit(int id, FormCollection collection)
{
try
{
// TODO: Add update logic here
return RedirectToAction(“Index”);
}
catch
{
return View();
}
}
- The first Edit() method is invoked by an HTTP GET operation. An Id parameter is passed to this method which represents the Id of the contact record being edited. The Entity Framework is used to retrieve a contact that matches the Id. A view that contains an HTML form for editing a record is returned.
- The second Edit() method performs the actual update to the database. This method accepts an instance of the Contact class as a parameter. The ASP.NET MVC framework binds the form fields from the Edit form to this class automatically.
- Notice that you don’t include the [Bind] attribute when editing a Contact (we need the value of the Id property).
- We need to modify the Edit action to perform actual operation
Controller\HomeController.cs
// GET: /Home/Edit/5
public
ActionResult Edit(int id)
{
var res = (from r in _entities.Author_Contact_Details where r.Id == id select r).FirstOrDefault();
return View(res);
}
//
// POST: /Home/Edit/5
[AcceptVerbs(HttpVerbs.Post)]
public
ActionResult Edit(Author_Contact_Details contactDetail)
{
if (!ModelState.IsValid)
return View();
try
{
// TODO: Add update logic here
var res = (from r in _entities.Author_Contact_Details where r.Id == contactDetail.Id select r).FirstOrDefault();
_entities.ApplyPropertyChanges(res.EntityKey.EntitySetName, contactDetail);
_entities.SaveChanges();
return RedirectToAction(“Index”);
}
catch
{
return View();
}
}
- Right click at either of Edit action and add View
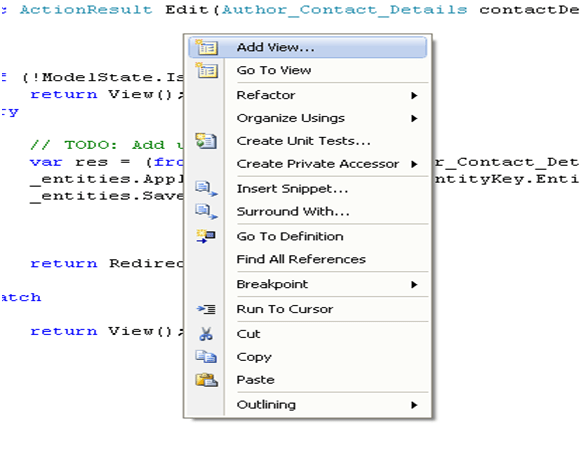
- Create a Strongly typed View. Select table name and in View content select Edit.
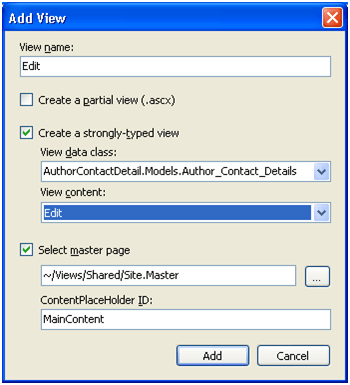
Just press F5 to run with debugging.

Deleting Contacts
Controller\HomeController.cs
public
ActionResult Delete(int Id)
{
var res = (from r in _entities.Author_Contact_Details where r.Id == Id select r).FirstOrDefault();
return View(res);
}
[AcceptVerbs(HttpVerbs.Post)]
public
ActionResult Delete(Author_Contact_Details contactDetail)
{
try
{
var res = (from r in _entities.Author_Contact_Details where r.Id == contactDetail.Id select r).FirstOrDefault();
_entities.DeleteObject(res);
_entities.SaveChanges();
return RedirectToAction(“Index”);
}
catch
{
return View();
}
}
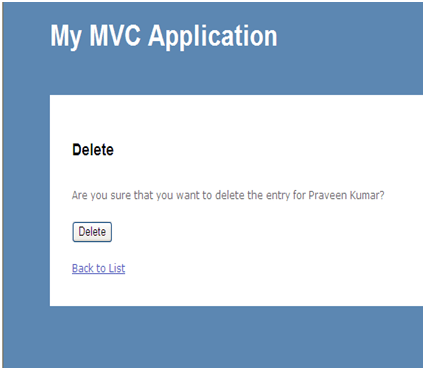
- The first Delete() action returns a confirmation form for deleting a contact record from the database.
- The second Delete() action performs the actual delete operation against the database. After the original contact has been retrieved from the database, the Entity Framework DeleteObject() and SaveChanges() methods are called to perform the database delete.
-
In Index.aspx and add below line of code there
<%= Html.ActionLink(“Delete”, “Delete”, new { id=item.Id })%>
Index.aspx
<%@
Page
Title=””
Language=”C#”
MasterPageFile=”~/Views/Shared/Site.Master”
Inherits=”System.Web.Mvc.ViewPage<IEnumerable<AuthorContactDetail.Models.Author_Contact_Details>>”
%>
<asp:Content
ID=”Content1″
ContentPlaceHolderID=”TitleContent”
runat=”server”>
Index
</asp:Content>
<asp:Content
ID=”Content2″
ContentPlaceHolderID=”MainContent”
runat=”server”>
<h2>Index</h2>
<table>
<tr>
<th></th>
<th>
Id
</th>
<th>
FirstName
</th>
<th>
LastName
</th>
<th>
Phone
</th>
<th>
Email
</th>
</tr>
<%
foreach (var item in Model) { %>
<tr>
<td>
<%= Html.ActionLink(“Edit”, “Edit”, new { id=item.Id }) %> |
<%= Html.ActionLink(“Delete”, “Delete”, new { id=item.Id })%>
</td>
<td>
<%= Html.Encode(item.Id) %>
</td>
<td>
<%= Html.Encode(item.FirstName) %>
</td>
<td>
<%= Html.Encode(item.LastName) %>
</td>
<td>
<%= Html.Encode(item.Phone) %>
</td>
<td>
<%= Html.Encode(item.Email) %>
</td>
</tr>
<% } %>
</table>
<p>
<%= Html.ActionLink(“Create New”, “Create”) %>
</p>
</asp:Content>
-
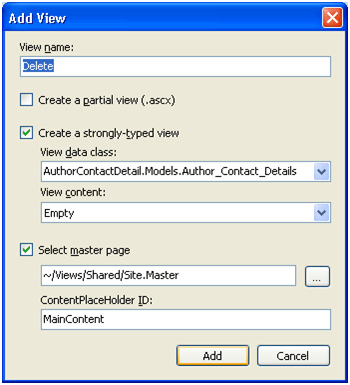
Right click either of Delete action and add View
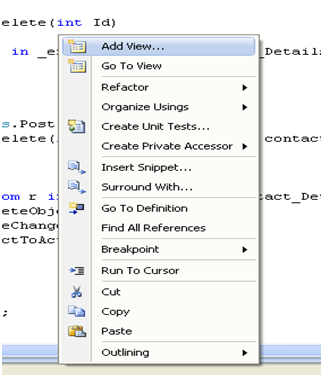
-
Create a Strongly typed view and select View content Empty.
Just press F5 to run with debugging.
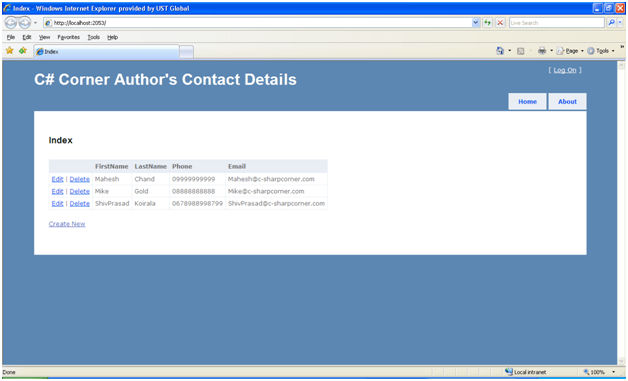
Changing the caption of the site
- Go to Views -> Shared -> Site.Master
- Change the title and save master page.
<div
id=”title”>
<h1>C# Corner Author’s Contact Details</h1>
</div>
Just press F5 to run with debugging.
Summary
This article explained about, how to perform CRUD operation on a table in ASP.Net MVC Framework.
Discover more from Dhananjay Kumar
Subscribe to get the latest posts sent to your email.

peroxide white teeth ivory white teeth whitener teeth whitening system premium white teeth white teeth smile
thank you so much for all your such informative post & writing..
i would like to request you to update this post as per MVC v_4.0/5.0 please..
thank you once again..
Только у нас совершенно БЕСПЛАТНАЯ и эффективная реклама Вашего бизнеса, услуг и товаров на ресурсе с ТИЦ 40, в Яндекс каталоге! ССЫЛКИ на сайты разрешены! http://rekforum.forum2x2.ru